Many years ago I began using Alice rucks purchased through surplus stores. My first experience with the ruck was during my service in the Tennessee State Guard. Since that time I have been modifying them for my use as well as my families. I have helped purchase hundreds of Alice rucks for boy/cub scouts, and have built dozens of these hybrid rucks that I have named the "Hellcat". The folowing is the "how to build" that I posted on ar15.com and the Survivalist Boards . Utilizing military surplus has been a great way to outfit my family with backpacks and gear we wouldn't otherwise be able to afford. A commercial pack that has the build and quality of the Hellcat will easily cost you $300 to $500; you can assemble this hybrid pack for under $70.
Assembling the "Hellcat": An ALICE/MOLLE Hybrid Ruck
By
Rod Teague
This is my version of the ALICE/MOLLE hybrid that I call the ALLE Pack or "Hellcat". The ALICE/MOLLE systems are inexpensive, plentiful, solid platforms from which to build a hybrid ruck. Hopefully this post will help you assemble a Hellcat without any difficulty; or maybe give you some additional ideas on how to develop your own hybrid.
The Hellcat has between 3500 ci (calculated by dimension) and 4000 ci (measured) capacity. 4000 ci and above are generally considered an expedition class pack. Adding the MOLLE sustainment pouches will add an additional 1000 ci (500 ci each) of capacity; and using the large ALICE ruck will give a potential 7500-8000 ci capacity. The hellcat in it's described form below is a legitimate expedition pack before the above additions are added; all for far less money than you will pay for any similar quality commercial pack.
Lets first start with all the components needed to assemble the Hellcat.
1. ALICE frame and medium ruck
2. one set MOLLE shoulder straps
3. one MOLLE moulded kidney pad
4. one MOLLE sleep system carrier
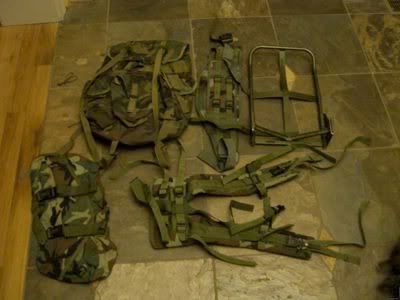
All of these items can be purchased for between $50-$70; even less if you shop around. I have been purchasing most of my surplus at www.gunnyssurplus.com here of late.
NEW UPDATE 4/27/12: A more recent source is Tony's Tactical; Tony is a first rate guy and fellow member on Survivalist Boards. He is an excellent source for hybrid rucks and has extensive experience in their assembly and use.
Step 1: Inspecting and attaching medium ALICE ruck to the frame
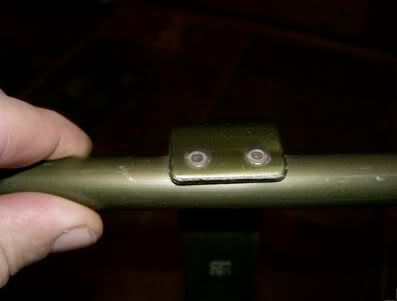
Inspect the frame for cracks and loose rivets; rivets should be tight as well as the joined parts. Repair or replace the frame if it is damaged.
Slip the medium ruck over the frame
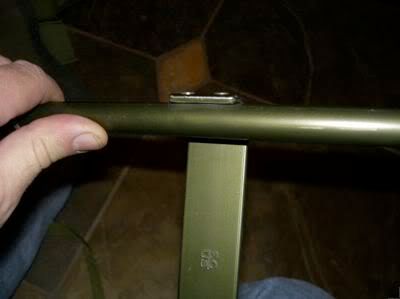
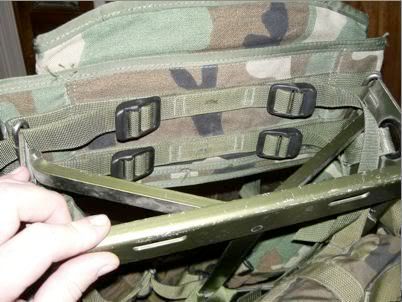
Loosen the bottom attachment straps on the ruck and slip the strap through the triangular holes created by the kidney brace at the bottom of the frame. DON'T OVER TIGHTEN at this point. You want some play so the ruck can expand properly while loading. Once your pack is loaded then these straps can be tightened.

STEP 2: Preparing the MOLLE shoulder straps
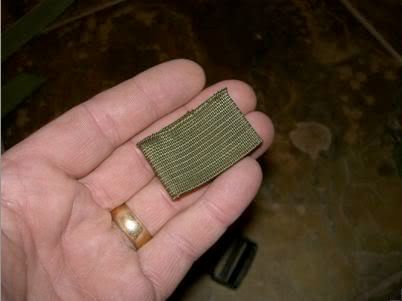
First start by removing the short attachment strap at the top of the MOLLE straps(they are attached to the load lifter straps); once both are removed set them aside. Keep up with them because you will need them in a few minutes.

Next inspect and prepare the flat "yoke" portion of the MOLLE straps. There is a long wide strap tacked in the center with a large fastex buckle underneath it; separate the two if they have been fastened together. Next, you will notice two sets of attachment straps running parallel to the yoke. Leave the straps in the buckles of the top set( you will not need these ) but loosen and remove the straps from the bottom set on both sides.

Next, fold the long center strap up so that it falls over the top of the shoulder straps

Don't worry about the top set of attachment straps; we'll fold those over and tuck them later in the assembly.
Step 3: Attaching the MOLLE shoulder straps
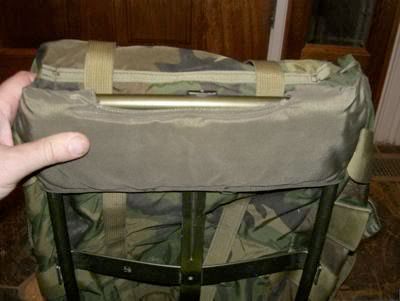
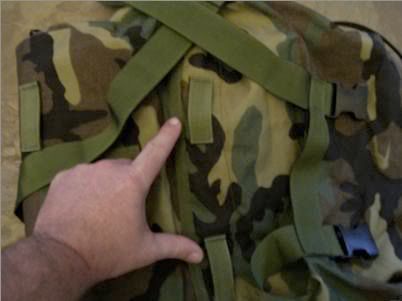
Lay the pack down and place the prepped shoulder straps in this approximate position; keeping them centered with the long center strap protruding from the top.
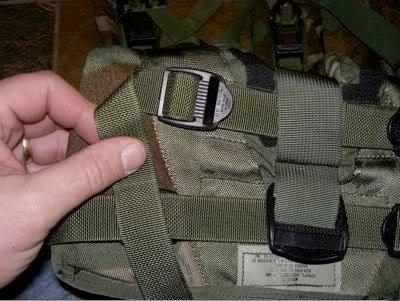
Next, take the short attachment straps that you had set aside and slip into the fastex buckle from the top. This is the same buckle you just removed them from.
It should look like this when you are done.
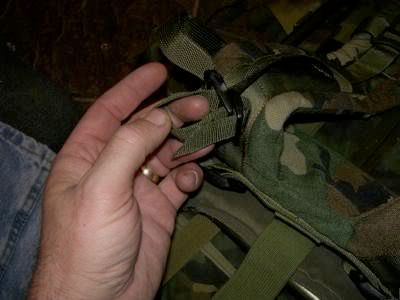
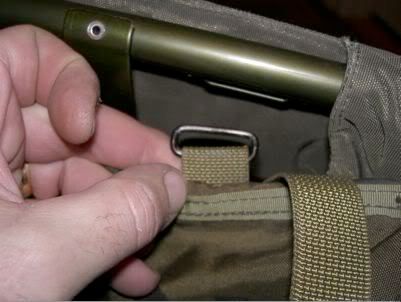
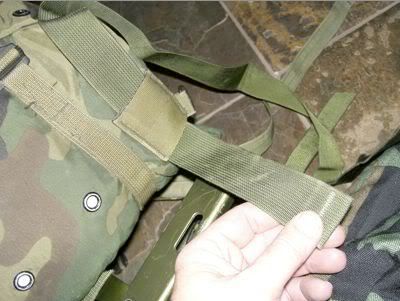
Now you are going to slip the end of this strap under the top of the frame and thru the slot; then thru the small D ring attachment on the ALICE ruck.


Now slip it back thru the buckle and back thru again ...... snugging it down. It should look like this when you are finished. Repeat the process for the other shoulder strap.

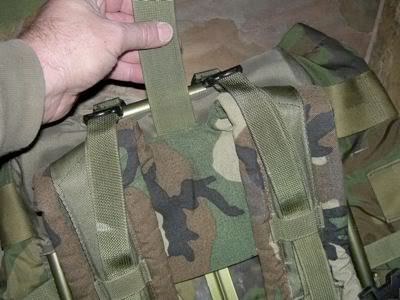
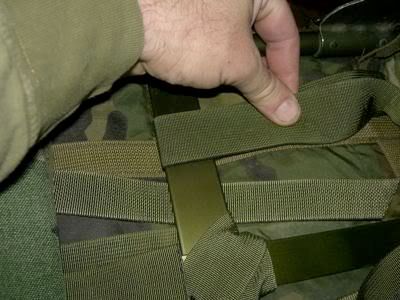
Now we begin attaching the long center strap; pull it over the top of the frame and push or tuck the strap down between the frame and the ruck.
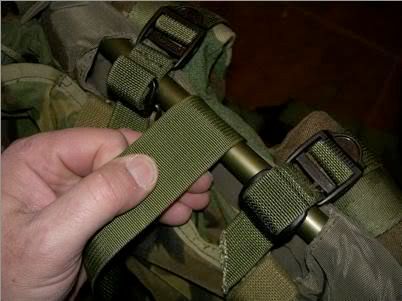
Once you have the strap tucked, lay the pack down so the underside of the frame is exposed.
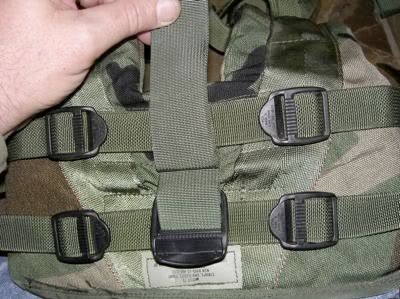
This, in my opinion, is where the MOLLE shoulder straps really show their worth. You can now adjust for torso fit and length. Something you could never do with issue straps or after market enhancements. In the pics above I have shown you can have as much as 5 inches of adjustment; so realistically you can adjust for about 15-20 inches of torso length. For now we will go ahead and secure the straps and adjust for torso fit later.
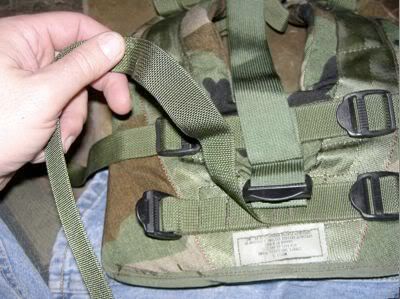
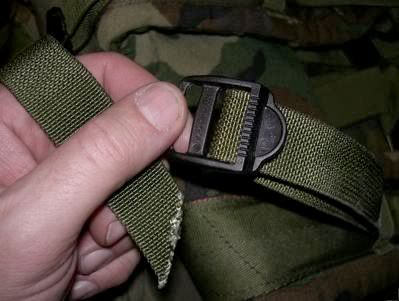
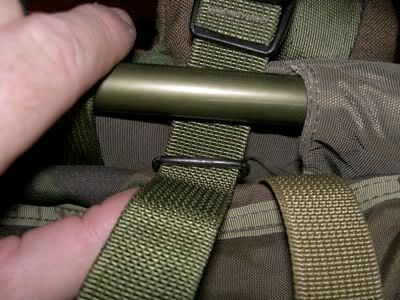
Adjust the straps so that they are a couple of inches below the top of the frame; as illustrated in the last pic above. Next wrap the strap around the center cross members as shown in the next pics. You can wrap several times; but once is enough. This will make torso fit a little easier.
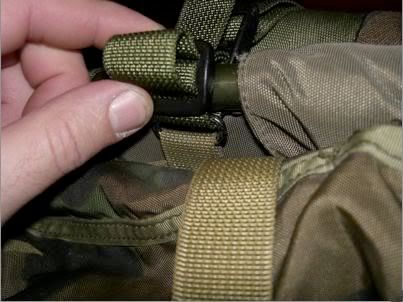
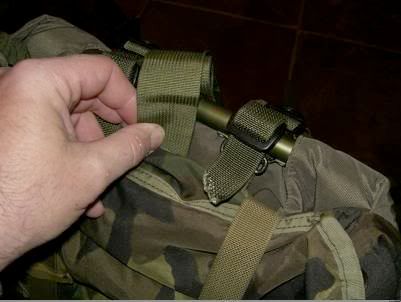
Flip up the yoke of the MOLLE straps and feed the long strap thru the buckle and tighten securely.


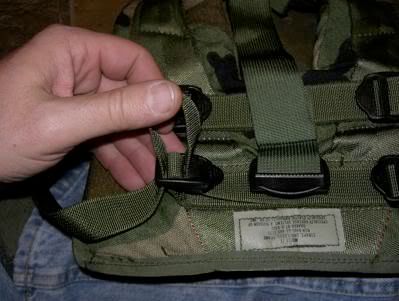
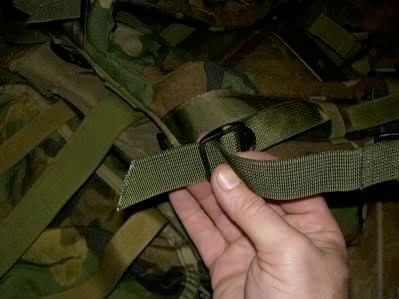
Attach the side bottom strap as shown; looping it around the frame and threading thru the buckle; snug down; then do the other side; adjusting so it is centered. Fold and tuck the loose ends.

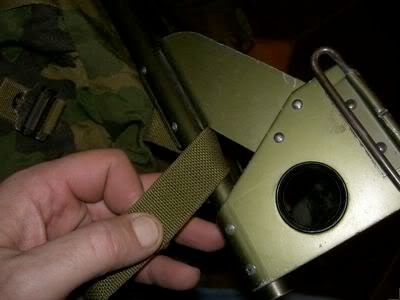
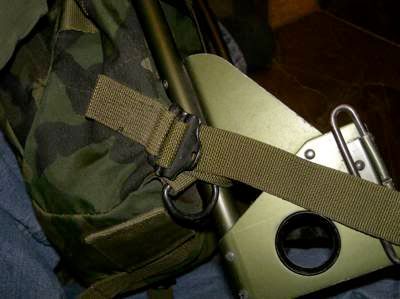
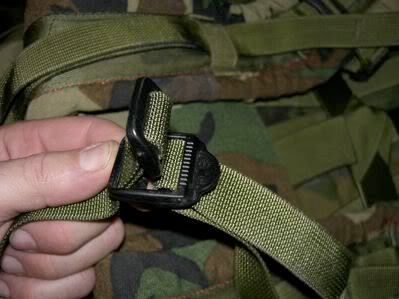
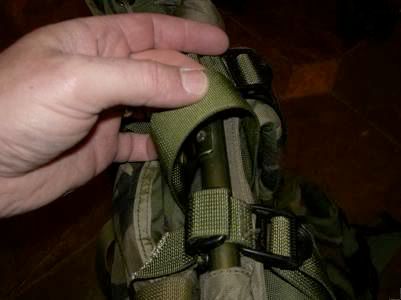
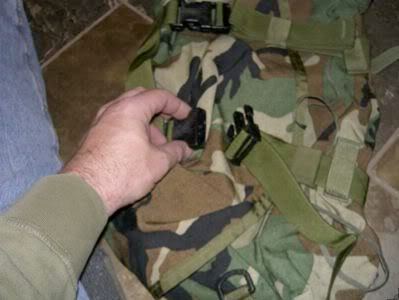
Separate the lower portion of the shoulder straps using the quick release mechanism(be carefull at this point; IMO the quick release is the weakest link in the MOLLE system and can be broken if forced open). Once released, take the loop end, and feed thru the round hole on the bottom of the frame; feed from outside to inside. Slip the QR end thru the loop and tighten.
Reattach the QR end back to the shoulder straps and you are done with attaching the MOLLE straps.
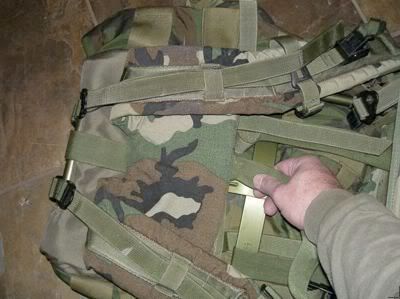
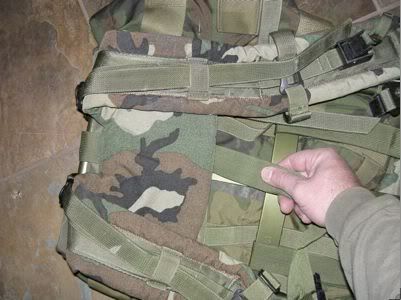
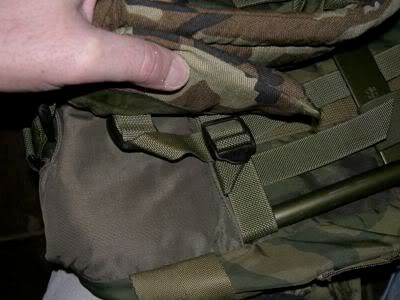
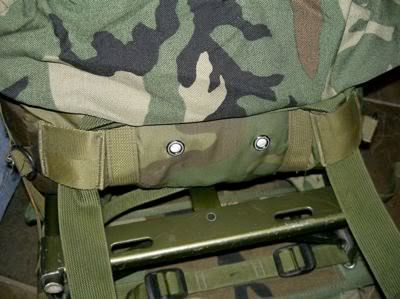
STEP 4: Attaching the MOLLE kidney belt
First, place the kidney pad as shown to ready it for attachment. THIS IS THE CORRECT POSITION. The hump should go down. Install this pad upside down and you'll kick the Hellcat to the curb; like I almost did two years ago. I put it on upside down because it looked like it belonged that way. Never mind that I could clearly see the MOLLE assembly instructions show the hump goes down. I paid for that bit of arrogance with two bleeding blisters the size of my hand on each side of my butt. Again, HUMP GOES DOWN.

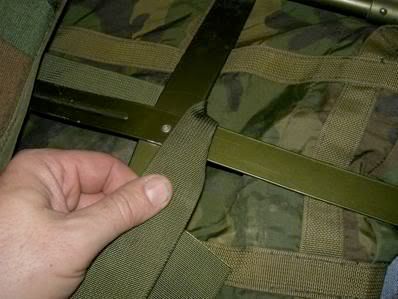
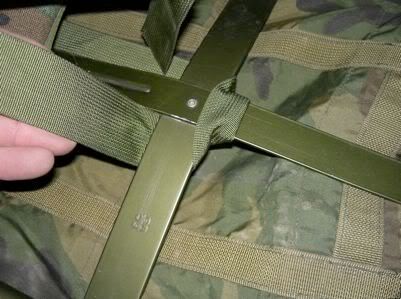
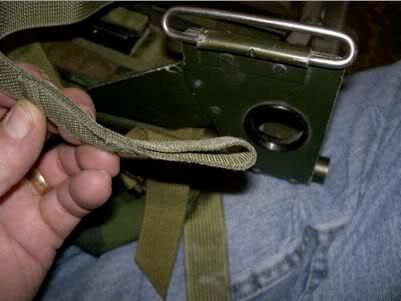
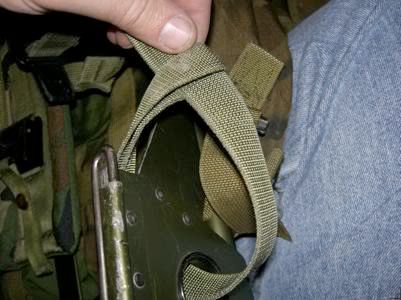
Next, flip it over to one side and feed the straps thru the metal slot and attach to the buckles; snug the straps down.
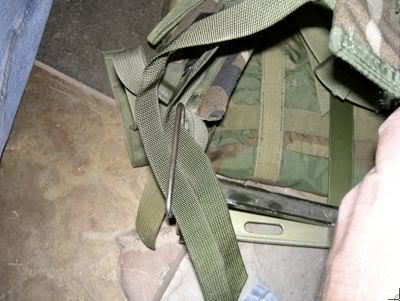
Do not tighten so hard that you deform the belt. There is going to be some play; but under load this has never been a problem. You are now finished attaching the MOLLE kidney belt.
STEP 5: Attaching the MOLLE sleep system carrier
We are now on the last leg to assembling the Hellcat. First thing to do is stuff a pillow into the ruck so as to give it some shape and offer some resistance while attaching the sleep system. You may want to give the carrier some bulk as well; but this step is optional.

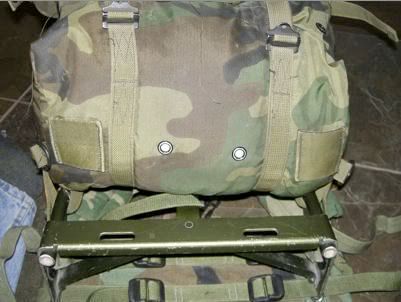
After you have cinched the top of the ruck, lay it down so you can see the bottom and the two lashing loops. These will be the primary points of attachment to the ruck.
Next, disconnect the fastex QR buckles on the sleep carrier; remove the male end from the straps and set aside. You will also want to slide the elastic keepers off as well.

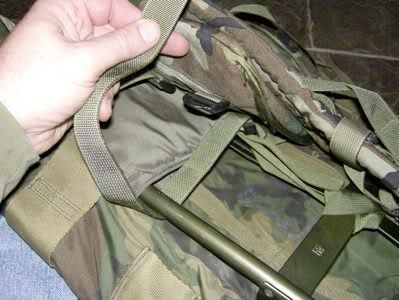
Next, you'll slide the cinch straps out of all their respective "strap loops". Three on each side until your carrier looks like this( top view of the carrier).

As a point of reference; the lashing loops of the ruck will set between the carrier handle and the rear top strap loops.
Slide the cinch straps thru the rucks lashing loops and then thru the top rear strap loops of the carrier.

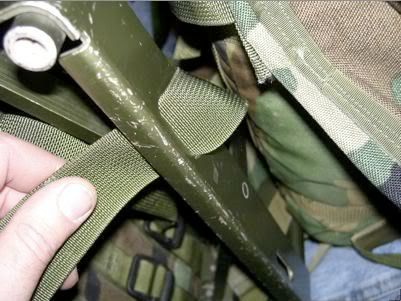
The sleep system carrier is now attached to the bottom of the ruck; but it's not stable at this point. We now attach it to the frame by running both cinch straps up the back of the ruck and over the cross support of the frame.
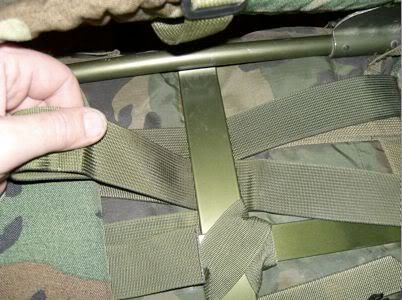

Once you are over the cross support, bring the cinch straps down; threading them thru the slots at the bottom of the frame. Feed them thru the flat side and exit the channel side. Snug them down securely.
The straps will now wrap around the bottom of the frame; ready to be threaded thru the second set of strap loops.

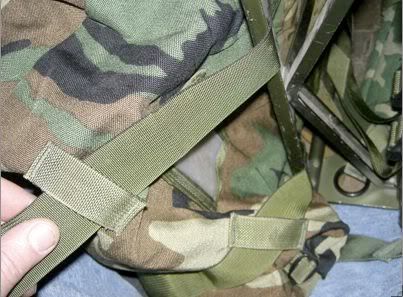
Once you've threaded them; snug up to the frame and thread the cinch straps thru the bottom front strap loops. Reattach the male ends of the fastex buckles and slide the elastic keepers back on. I kept mine off.

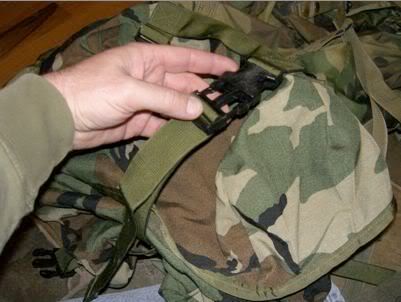
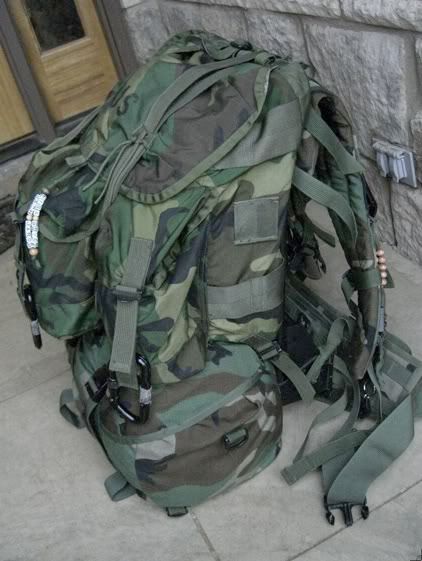
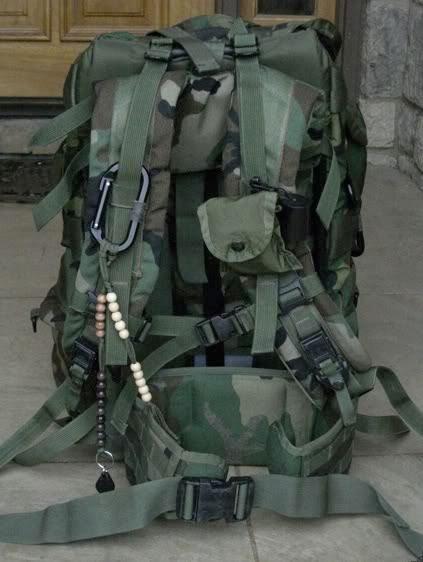
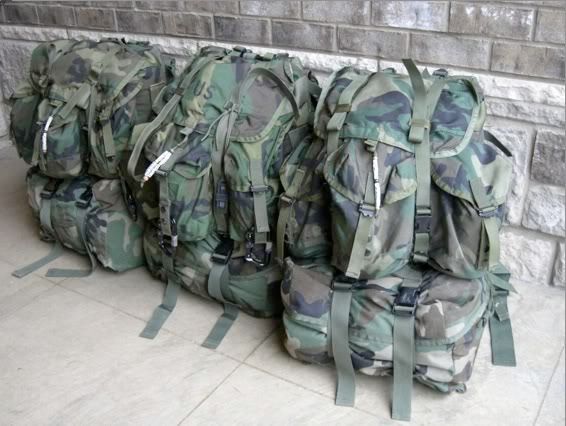
Your Hellcat is ready for business; you should have a pack that looks just like one of these.

Hopefully this wasn't too confusing; and like any system, not all these mods may work for you. I have found this particular hybrid to be very forgiving and rock solid; but it it's only as good as the person putting it together. Assemble it using the ALICE and MOLLE components properly, and the Hellcat should take you there and back. My next post on this subject will be a torso fit and adjustment guide for the Hellcat.
The money that can be saved by building your own pack and can be quite significant; hopefully by using this "how to" you and your family will get many years of enjoyment on the great trails our country has to offer. All for pennies on the dollar. Thanks for looking. Now, go build a Hellcat ......... and build a legacy!
JB
Here are a couple of pics of the large ALICE ruck instead of the medium.


This is a great Idea. I bought one of these assembled and am having trouble adjusting it for torso fit. It looks to me the problem is the torso adjustment strap. My shoulder straps are Desert camo, (not sure that makes a difference) and the strap seems to come from the bottom, not the top. Either way (upwards toward the top or down to the bottom) it is too short to fit my torso. It's not that I am a wookie or anything, far from it in fact. My torso measures just 16" Any help will be appreciated.
ReplyDeleteThanks.
Jim
Jim,
ReplyDeleteSorry this took me so long to respond back; the spam detection is preventing me seeing some of the post's. It shouldn't matter what color the shoulder harness is; the adjustment straps should all be the same length. Sometimes with surplus; straps get cut by the soldiers in the field. I'll measure mine and see what the proper length should be.
Would this work with the large ruck as well? Or does the large ruck take up to much room?
ReplyDeleteJB
Yes, it will work with the large ALICE ruck. I'll see if i can dig up a few pics.
DeleteFYI, you need to clip some stitching on the MOLLE belt kidney pad on 4 of the straps so you don't have to worry about deforming the belt. That way you can tighten the straps as much as you want and it will be just as tight as the original waste straps. I saw it mentioned on a youtube video, tried it tonight, and it works perfect. If you add that to your setup it will be 100% perfect. It makes it so it's just the same lenght as the original waste pad/belt.
ReplyDeleteNext I'm going to do you Bobcat mod with the extra straps from this mod and the extra pack I got for $8. Thanks a lot.
I had done the shoulder strap and kidney belt conversion quite some time ago on a large Alice I had. Made a world of difference in how the pack carried.
ReplyDeleteAfter seeing a kit online I thought to myself, I've already got 2/3rds of the conversion done, only thing left is the sleep system carrier. Went to my local source for surplus and they had them used and at a great price. I replaced my compression set up with the sleep system carrier and I think I will be happy with the whole rig.
If I need more then what I can carry in this pack, it's time to take the motorhome instead! Thanks for posting the directions, I've shared them with quite a few friends so they can convert there stock packs.
Great tutorial, thank you! I do have a question, though. I updated to the MOLLE kidney pad and am still having comfort issues. If I put more than 20 lbs in my pack, the brackets on the frame (where the kidney pad attaches) dig into my lower back. I feel them through the belt and it starts to hurt after a few miles on the trail. Will upgrading the shoulder straps allow for some kind of adjustment that alleviates this issue? Or should I look at a different frame?
ReplyDeleteI hacked those things off and now have a flat frame with just the belt attached to the frame works great. very comfortable.Used the waist belt and shoulder straps from a cp-90 pack and they work real nice too. replaced all buckles and fasteners with fastex buckles. added a camel back system to the outside and it is good to go.
DeleteThis comment has been removed by the author.
DeleteHere is a way to fix the wobble and pain associated with the kidney belt.
Deletehttps://www.youtube.com/watch?v=E_FW6LiblUI
Dear Sir,
ReplyDeleteAfter visiting you website, we have come to know that you are the importer of Paintball & Military Tactical Gears.
We have decided to approach you directly and introduced as an old established leading manufacture-cum-exporter Company of Paintball & Military Tactical Gears.
We are specialized in the following Paintball & Military Tactical Gears.
Tactical Vests:- Deluxe Tactical Gear, Tactical Ten Vest, Molle Vest, Tactical Paintball Vests, Elite Tactical Vest.
Tactical Bags:- Rifle Causes, Marker Cause, Triangle gun cause, Trizip Bag,
Tactical Gloves:- Paintball Armor Gloves, SOF Gloves, Heavy Duty Leather Gloves
Upper Garments:- BDU Uniforms, Coverall, Cargo Pants and jerseys with costom logo, Chest Pro/Ref Armor, Slickers/Rain Suits, Hoodie,
Tactical Under Garments, Paintball Pod Packs/Harness.
Other Accessories:- Remote Hose Covers, Snoods, Shemagh, Elbow Pads/ Knee Pads, Arm Band with Quick Release Belt, Mag Pouches, Slings.
Beanies, Neck & Half face protectors, Barrel Socks etc.
Under the burning desire of our company to establish business relation in a better life quality, lowest competitive prices than other suppliers We have a vast arrangement in this field with modern machinery and technical man power. We can supply any quantity with quality during the desired period. The samples are available for your satisfaction and evaluation. 1 st rate the quality, workmanship, material, durability, and than let us know the result.
Thanks & Regards,
Nazir Hussain.
This comment has been removed by the author.
ReplyDeleteLove the hellcat. Thinking of mounting the mss on top of the Pac, to keep the weight high and to keep it'd pulling me backwards. Also going to add some molle sustainment pouches on the sides. What do you guys think of mounting it on top?
ReplyDeletecan't I just buy a hell cat modified ruck ?
ReplyDeleteCan truly relate and retain this outstanding post. Very well written.
ReplyDeleteMolle Bag
Your pictures are not loading
ReplyDeleteMust be a local problem on your end, I have no problem viewing the pictures on a machine running Windows 7 with Google Chrome as my browser.
DeleteThis comment has been removed by the author.
ReplyDeleteHere is a way to fix the wobble and pain associated with the kidney belt.
Deletehttps://www.youtube.com/watch?v=E_FW6LiblUI
Hi,
ReplyDeleteI’m really impressed with your blog article, such great & useful knowledge you mentioned here
Tactical Military Gear :- Quality-outdoor offer tactical military gear and army equipment for salein Israel. Use our promotion discount codes to get even larger discount.
Is these a way to buy an complete upgrade set in woodland camo for an medium Alice Pack? IM living in The Netherlands. Cant buy them hete. Or can i buy a complete hellcat en ship it towards the Netherlands? A normal Alice pack in the Netherlands costs ca $ 65,- incl. delivery
ReplyDeletewww.missionbaydentalcare.com
ReplyDeleteSan Diego Dentist
Dentist in San Diego
Can anybody give us info on Bob Cat conversion useing a piece of pipe in the envelop of the Alice
ReplyDeleteNice post. Thank you for posting something like this.
ReplyDeletePlease write on Tactical Molle Backpacks
Buen día muy interesante tu enseñanza vivo en edo.de México quiero comprar una mochila así cuánto y dóndeme recomiendas es mi primera
ReplyDeleteHi, just recently found this blog and it is excellent!
ReplyDeleteSaw the YouTube link for addressing the kidney belt, but YouTube says it's a private video. Can you help me with that?
Hopefully you're still monitoring this blog.
Thanks
I enabled the link for the belt mod. https://youtu.be/E_FW6LiblUI
DeleteThanks! Basically what I figured.
DeleteI'm thinking of re-hand stitching mine with nylon upholstery thread instead of using glue.
I'm wrapping up on this awesome mod to my original ALICE, way more comfortable!
ReplyDeleteWhile test fitting I found the height adjustment buckle digs into my spine right between my shoulder blades. Does this issue resolve once I load the pack with weight, or do I need to do something additional?
I really like reading through a post that can make people think. Also, many thanks for permitting me to comment!
ReplyDeletebest backpacks for back support
Hey I’m Martin Reed,if you are ready to get a loan contact.Mr Benjamin via email: lfdsloans@lemeridianfds.com,WhatsApp:+1 989-394-3740 I’m giving credit to Le_Meridian Funding Service .They grant me the sum 2,000,000.00 Euro. within 5 working days. Le_Meridian Funding Service is a group investors into pure loan and debt financing at the returns of 1.9% to pay off your bills or buy a home Or Increase your Business. please I advise everyone out there who are in need of loan and can be reliable, trusted and capable of repaying back at the due time of funds.
ReplyDelete5.11 range bags are ideal for the storage of your pistol, accessories, and ammo. They come in a variety of sizes and designs to meet your needs. 5.1 range bag is made for long-term usage. The five bags featured here are well-known for their rugged construction. I am also aware of the importance of organization and capacity, so I considered those.
ReplyDeletewhy would you ever want to use that kind of torture on yourself? i have 2 alice packs and i would never even think of using that frame. it is one of the worst things the military ever invented.
ReplyDeleteThanks for this information. Lets visit https://demoduct.com/best-rucking-backpack/
ReplyDelete